 ModAPI Hub
Develop mods
Generic Unity games + Basic ModAPI usage
Getting started
Write your own mod with this tutorial. Basic C# knowledge would be an advantage. Unity knowledge is also good.
In this tutorial we want to change the ingame day by using the GUI.
First we need ModAPI itself:
ModAPIIf you haven't already, extract it somewhere.
Now we need Visual Studio (not Visual Studio Code!). You can grab it for free here:
Visual StudioYou can even get Professional for free if you are a student. Optionally get the ReSharper extension.
Next, we need a DLL decompiler. There are some out there, but in this tutorial i will go with ILSpy:
ILSpyor ILDASM
or Jetbrains dotPeek
or .NET Reflector
or dnSpy
In most games ModAPI specific methods, attributes, etc. can be used. However, Green Hell uses its own / unity methods. Continue at the Green Hell section for the tutorial and quirks.
Create Project
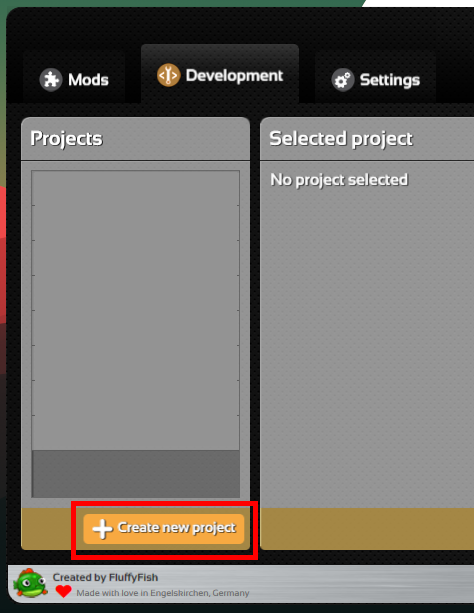
Open ModAPI, go to the development tab and click "Create new project":
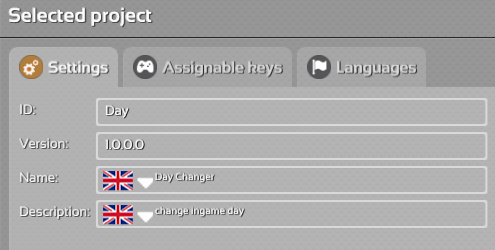
Give your project an ID. Click on the new mod on the left side. Give it a name and optionally a description:
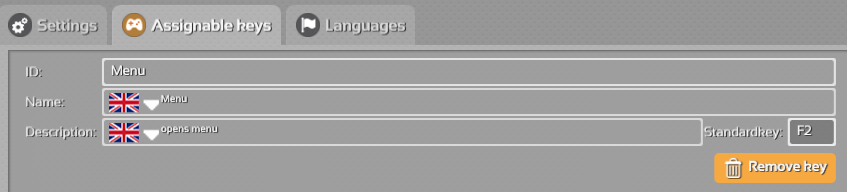
If you need, add a hotkey in "Assignable keys":
Open Project
Navigate to "/projects/TheForest/Day/" in your ModAPI folder and open the "*.sln" with Visual Studio.
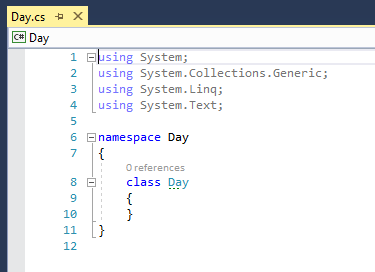
Add a new class to our project:
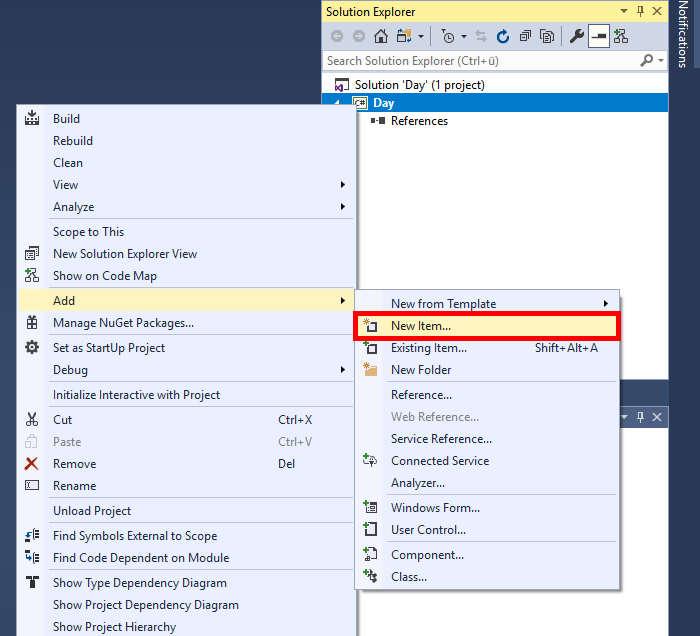
Visual C# Items > Class > and name it something like "Day.cs". It should open and look something like this:
GUI
First, we need to add our stuff to the game. We do that by creating a new GameObject and appending our class:
using System;
using System.Collections.Generic;
using System.Linq;
using System.Text;
using ModAPI.Attributes;
using TheForest.Utils;
using UnityEngine;

namespace Day
{
    class Day : MonoBehaviour
    {
        [ExecuteOnGameStart]
        private static void AddMeToScene()
        {
            new GameObject("__Day__").AddComponent<Day>();
        }
    }
}
[ExecuteOnGameStart] initializes it once the game starts.
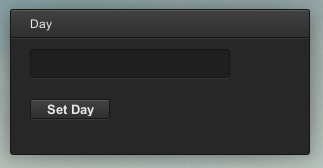
Now we create the GUI layout with an input box, where you enter the day you want and a button to set the day:
private bool visible;
protected GUIStyle labelStyle;
private string day = "";

private void OnGUI()
{
	if (visible)
	{
		// use ModAPI Skin
		GUI.skin = ModAPI.Interface.Skin;

		// apply label style if not existing
		if (this.labelStyle == null)
		{
			this.labelStyle = new GUIStyle(GUI.skin.label);
			this.labelStyle.fontSize = 12;
		}

		// create box (background)
		GUI.Box(new Rect(10f, 10f, 300f, 150f), "", GUI.skin.window);

		// Label
		GUI.Label(new Rect(30f, 15f, 200f, 20f), "Day", this.labelStyle);

		// Text-input
		day = GUI.TextField(new Rect(30f, 50f, 200f, 30f), day, GUI.skin.textField);

		// Button
		if (GUI.Button(new Rect(30f, 100f, 80f, 20f), "Set Day"))
		{
			// TODO
		}
	}
}
We still need to open the menu by using the key we assigned in ModAPI:
private void Update()
{
	// if clicked button
	if (ModAPI.Input.GetButtonDown("Menu"))
	{
		// show cursor
		if (visible)
		{
			LocalPlayer.FpCharacter.UnLockView();
		}
		else
		{
			LocalPlayer.FpCharacter.LockView(true);
		}
		// toggle menu
		visible = !visible;
	}
}
Build Project
We can build and run our project and see if it works. Either click "Start" or "Build > Build Solution (CTRL + SHIFT + B)"

The build should finish with "Build: 1 succeeded".

Go to ModAPI and click "Create Mod" in the lower right of your project. It should say "Created mod successfully". If you create the mod again in the future, increment the version or delete the mod in "<ModAPI>/mods/TheForest/Day*.mod".
View the "Mods"-Tab in ModAPI and toggle your new mod.
Click on "Start game".
Open a singleplayer game and hit our hotkey.
Now we need to find the function that actually changes the day.
Decompiling the game
Start ILSpy and click on "File > Open". Select the "Assembly-CSharp.dll" in The Forest folder: "..\SteamApps\common\The Forest\TheForest_Data\Managed\"
We can search for something like "Day". "Clock.Day" luckily is public static, so we can call it directly.

Add
Clock.Day = Int32.Parse(day);Build the project again and we are done.
Injecting Code
To inject code into existing methods you have to extend from the class containing the method. As an example we look at the "TheForestAtmosphere" class.
To add code into an existing method you just override the method. This is possible with public and private methods.
NOTICE: In the current ModAPI version you can only override methods with a void or bool return!
class TheForestAtmosphereExtended : TheForestAtmosphere
{
	private void Update()
	{
		//
	}

	// will be:
	protected override void Update()
	{
		//
	}
}
and
public void TimeLapse(){}

// will be:
public override void TimeLapse() {}
With this code you'll overwrite the whole method. To call the original code you have to add a call to the base method. When you do this, your method will be chained.
protected override void Update() {
	// Code before the original code
	base.Update();
	// Code after the original code
}
Notice that your code after the original method might not be executed when it returned before.
If you need to override functions which are also changed by other mods you can add this attribute to you function. Priority takes an integer which changes the execution order accordingly:
[ModAPI.Attributes.Priority(2)]Adding methods, fields and classes
Besides the possibility of overwriting methods you can also add fields, methods annd classes. The overwriting of standard values of existing fields is not supported yet. An alternative for this purpose is to inject (or add) code into the Start() method. This method will be called by Unity when the MonoBehaviour object is created.
Debugging
To log some code or to test if something successfull or threw an exception you can write it to the log.
ModAPI.Log.Write(e);You can find the logfile in The Forest folder: "/Mods/Logs/*modname*.log"
GUI elements
Label
GUI.Label(new Rect(10f, 10f, 500f, 20f), "TEXT", labelStyle);Button
if (GUI.Button(new Rect(10f, 10f, 150f, 20f), "BUTTON")){}Textfield
string text = GUI.TextField(new Rect(10f, 10f, 200f, 30f), text, GUI.skin.textField);Toggle
bool toggled = GUI.Toggle(new Rect(10f, 10f, 20f, 30f), toggled, "");There are other elements that you can use... just decompile other mods (*modname*.dll) like you did with The Forest and see how they implemented them.
Wrap up
Those were the basics in writing simple mods.
There is more to discover, e.g. loading Resources (images) into the game with ModAPI.
If you have problems or questions, feel free to ask them on our Discord server #development :)
Green Hell
This section is brought to you by Werkrat.Project settings
Green Hell uses a different .NET Framework, so you need to change the target framework after creating the mod in ModAPI:
- Click Project -> *project name* Properties
- Set "Target Framework" to ".NET Framework 4"
- Click "Yes"
You will have to change the target framework every time you use "Build Mod" in ModAPI because it resets the framework version.
ModAPI attributes
Attributes aren't working in Green Hell, so [ExecuteOnGameStart] won't do anything. Depending on what you're doing, you might have to find a suitable insertion point:
Most of the time adding the GameObject after the player is initialized should be fine.
class AddMyGameObject : Player
{
	protected override void Start() //Hook Player Start() method
	{
		base.Start();
		new GameObject("__Example__").AddComponent(); //Add your GameObject after the player has been initialized
	}
}
ModAPI method replacements
You will not be able to use ModAPIs button mappings. E.g. "ModAPI.Input.GetButtonDown" has to be rewritten.
You have to hard-code the key using normal Unity methods.
if (Input.GetKeyDown(KeyCode.F7)){}It is still a good idea to add the button in ModAPI, so users will know which button to press without looking at the description.
Custom GUI
You can use this function to enable/disable the cursor when opening your GUI. The full GUI function can be downloaded below.
private void EnableCursor(bool enabled = false) //creating a helper to more easily enable/disable mouse
{
	//If your UI is only showing info and not showing any buttons, you probably don't need to show the mouse
	CursorManager.Get().ShowCursor(enabled, false);
	Player player = Player.Get();

	//optionally block some other actions while your GUI is open... remove these or comment out
	if (enabled)
	{
		player.BlockMoves();
		player.BlockRotation();
		player.BlockInspection();
	}
	else
	{
		player.UnblockMoves();
		player.UnblockRotation();
		player.UnblockInspection();
	}
}
Mod example
This mod example includes the following including detailed comments:
- Injecting your GameObject
- Key Buttons
- Creating a GUI
- Adding Cursor to the GUI
- Changing player sanity
You can download the full class here:
GreenHell_Example.cs